Configurations
Files weather station
This command exports historical weather information to a CSV file for each weather station.
To execute any ForecastApp command you must use the following line of code dotnet CIAT.DAPA.USAID.Forecast.ForecastApp.dll this will execute the file that will start the ForecastApp process, this command must be followed by the action you want to do.
To execute the export of the historical weather information per each weather station you must use the following command dotnet CIAT.DAPA.USAID.Forecast.ForecastApp.dll -out -wf -p “path where the file is exported” -name “value” -c “country_id”.

Note
The command consists of the following parts:
dotnet CIAT.DAPA.USAID.Forecast.ForecastApp.dll = This is the first mandatory part for all ForecastApp commands, it must be complemented with the command you want to perform.
-out = As this is an export process, the -out parameter must be used to indicate that a data export will be performed.
-wf = Export the configuration file of the weather stations. You should add the parameter “-name”.
-p “path where the file is exported” = The -p parameter indicates the path where the file to be exported, this parameter is followed by the path, example: -p “C:\Users\Csv\Export\”
In case you use a Linux operating system the path must be separated by / and in Windows you must use \.
Linux example: -p “/Users/Csv/Export/”
Windows example: -p “C:\Users\Csv\Export\”
-name “value” = This parameter is the filter of the of the file name to export.
-c value = Mandatory parameter. It is the ObjectId of Country to export data for only country indicated in the parameter.
Once the command is prepared with all the parameters, copy the command in the console and press Enter, the process will perform the export of all data and once finished it will display the message Export process has finished.
At the end of the export, the prediccionClimatica folder will be generated and within it the dailyData folder and within this folder there will be a CSV file with the name of the id of the weather station that it represents
weather_station_id.csv
Column |
Meaning |
|---|---|
day |
day of the month - number type |
month |
month of the year - number type |
year |
year - number type |
t_max |
maximum temperature °C - double type |
t_min |
minimum temperature °C - double type |
prec |
precipitation mm - double type |
sol_rad |
solar radiation MJ/m²d - double type |
Note
The file must be in the following format:
The data it contains are: day, month, year, maximum temperature (t_max), minimum temperature (t_min), precipitation (prec) and solar radiation (sol_rad).
The first row of the file is the header and should be in the following format:
day,month,year,t_max,t_min,prec,sol_rad
The following lines should contain the information for this station. Example:
1,1,1980,30.67449154,22.67449154,0,16.37537505
The units of measurement for each variable are:
t_max = °C
t_min = °C
prec = mm
sol_rad = MJ/m²d
The following is an example of what the file would look like in the excel viewer
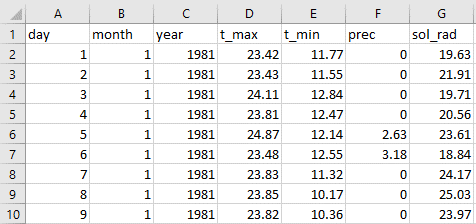
The following is an example of what the file would look like in text viewer

Coordinates weather station
This command exports in a CSV file the coordinates of each of the weather stations of the indicated country.
To execute any ForecastApp command you must use the following line of code dotnet CIAT.DAPA.USAID.Forecast.ForecastApp.dll this will execute the file that will start the ForecastApp process, this command must be followed by the action you want to do.
To execute the export of the coordinates of each weather station you must use the following command dotnet CIAT.DAPA.USAID.Forecast.ForecastApp.dll -out -co -p “path where the file is exported” -name “value” -c “country_id”.

Note
The command consists of the following parts:
dotnet CIAT.DAPA.USAID.Forecast.ForecastApp.dll = This is the first mandatory part for all ForecastApp commands, it must be complemented with the command you want to perform.
-out = As this is an export process, the -out parameter must be used to indicate that a data export will be performed.
-co = Create a file by every weather station with their coordinates.
-p “path where the file is exported” = The -p parameter indicates the path where the file to be exported, this parameter is followed by the path, example: -p “C:\Users\Csv\Export\”
In case you use a Linux operating system the path must be separated by / and in Windows you must use \.
Linux example: -p “/Users/Csv/Export/”
Windows example: -p “C:\Users\Csv\Export\”
-name “value” = This parameter is the filter of the of the file name to export.
-c value = Mandatory parameter. It is the ObjectId of Country to export data for only country indicated in the parameter.
Once the command is prepared with all the parameters, copy the command in the console and press Enter, the process will perform the export of all data and once finished it will display the message Export process has finished.
At the end of the export, the prediccionClimatica folder will be generated and within it the dailyData folder and within this folder there will be a CSV file with the name of the id of the weather station that it represents followed by _coords.
weather_station_id_coords.csv
Column |
Meaning |
|---|---|
lat |
latitud |
lon |
longitud |
Note
The file must be in the following format:
The data it contains are: lat, lon.
The first row of the file is the header and should be in the following format:
lat,lon
The following lines should contain the information for this station. Example:
3.52,-73.72
The following is an example of what the file would look like in the excel viewer
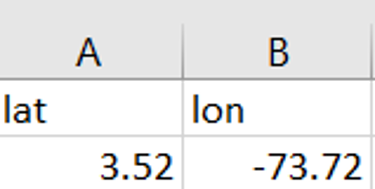
The following is an example of what the file would look like in text viewer

CPT setup
This command exports the CSV files needed to run the CPT process on the forecast
To execute any ForecastApp command you must use the following line of code dotnet CIAT.DAPA.USAID.Forecast.ForecastApp.dll this will execute the file that will start the ForecastApp process, this command must be followed by the action you want to do.
To execute the export of the CPT setups you must use the following command dotnet CIAT.DAPA.USAID.Forecast.ForecastApp.dll -out -cpt -p “path where the file is exported” -c “country_id”.

Note
The command consists of the following parts:
dotnet CIAT.DAPA.USAID.Forecast.ForecastApp.dll = This is the first mandatory part for all ForecastApp commands, it must be complemented with the command you want to perform.
-out = As this is an export process, the -out parameter must be used to indicate that a data export will be performed.
-cpt = Export the configuration for cpt. It includes the theorical regions and cpt modes.
-p “path where the file is exported” = The -p parameter indicates the path where the file to be exported, this parameter is followed by the path, example: -p “C:\Users\Csv\Export\”
In case you use a Linux operating system the path must be separated by / and in Windows you must use \.
Linux example: -p “/Users/Csv/Export/”
Windows example: -p “C:\Users\Csv\Export\”
-c value = Mandatory parameter. It is the ObjectId of Country to export data for only country indicated in the parameter.
Once the command is prepared with all the parameters, copy the command in the console and press Enter, the process will perform the export of all data and once finished it will display the message Export process has finished.
At the end of the export, the prediccionClimatica folder will be generated and within it the the folder estacionesMensuales is generated, which will contain a folder for each state of the selected country, within the folder of each state there will be two files.
cpt.csv
Column |
Meaning |
|---|---|
var |
The variable to which the setting corresponds |
trimester |
The quarter to which the configuration corresponds |
Note
The file must be in the following format:
The data it contains are: var, trimester.
The first row of the file is the header and should be in the following format:
var,djf,jfm,fma,mam,amj,mjj,jja,jas,aso,son,ond,ndj
The following lines should contain the information. Example:
x_modes,10,10,10,10,10,10,10,10,10,10,10,10
The following is an example of what the file would look like in the excel viewer

The following is an example of what the file would look like in text viewer

areas.csv
Column |
Meaning |
|---|---|
order |
Indicates the order they should be listed |
var |
The variable to which the setting corresponds |
trimester |
The quarter to which the configuration corresponds |
Note
The file must be in the following format:
The data it contains are: order, var, trimester.
The first row of the file is the header and should be in the following format:
order,var,djf,jfm,fma,mam,amj,mjj,jja,jas,aso,son,ond,ndj
The following lines should contain the information for this station. Example:
1,x1,180,180,180,180,180,180,180,180,180,180,180,180
The following is an example of what the file would look like in the excel viewer
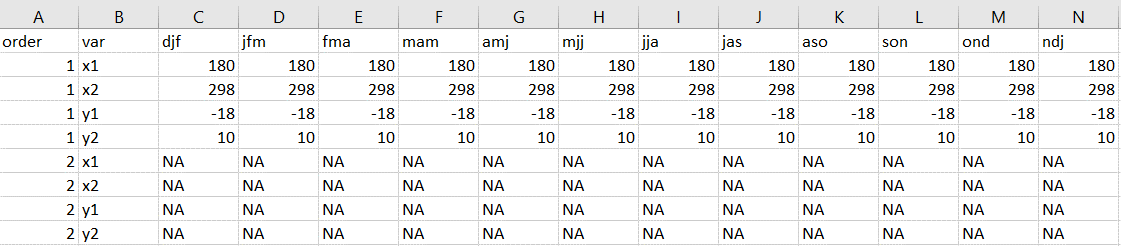
The following is an example of what the file would look like in text viewer

Field |
Meaning |
|---|---|
trimester |
Sets the quarter for which the forecast is made |
x_mode |
Number of modes in x |
y_mode |
Number of modes in y |
cca_mode |
Number of modes in canonical correlation |
djf |
December January February |
jfm |
January February March |
fma |
February March April |
mam |
March April May |
amj |
April May June |
mjj |
May June July |
jja |
June July August |
jas |
July August September |
aso |
August September October |
son |
September October November |
ond |
October November December |
ndj |
November December January |
Configuration PyCPT (seasonal and subseasonal)
This command exports the JSON files with the necessary settings for PyCPT for both seasonal and sub-seasonal.
To execute any ForecastApp command you must use the following line of code dotnet CIAT.DAPA.USAID.Forecast.ForecastApp.dll this will execute the file that will start the ForecastApp process, this command must be followed by the action you want to do.
To execute the export of PyCPT configuration you must use the following command dotnet CIAT.DAPA.USAID.Forecast.ForecastApp.dll -out -py -p “path where the file is exported” -m “value” -c “country_id”.

Note
The command consists of the following parts:
dotnet CIAT.DAPA.USAID.Forecast.ForecastApp.dll = This is the first mandatory part for all ForecastApp commands, it must be complemented with the command you want to perform.
-out = As this is an export process, the -out parameter must be used to indicate that a data export will be performed.
-py = Export json file from pycpt configuration for seasonal by country or by state depends of indicator.
-p “path where the file is exported” = The -p parameter indicates the path where the file to be exported, this parameter is followed by the path, example: -p “C:\Users\Csv\Export\”
In case you use a Linux operating system the path must be separated by / and in Windows you must use \.
Linux example: -p “/Users/Csv/Export/”
Windows example: -p “C:\Users\Csv\Export\”
-m “value” = Mandatory parameter. It is the Month number that you want to export. It just works for PyCPT export file
-st “value” = Optional parameter. It is the ObjectId of State to export coordinates of weather stations by State.
-c value = Mandatory parameter. It is the ObjectId of Country to export data for only country indicated in the parameter.
Once the command is prepared with all the parameters, copy the command in the console and press Enter, the process will perform the export of all data and once finished it will display the message Export process has finished.
At the end of the export, the prediccionClimatica folder will be generated and within it the NextGen folder and within this folder there will be a two JSON files with the names “seasonal_pycpt” and “subseasonal_pycpt”.
The following is an example of what the file would look like:

Forecast setup
This command exports in a single file all the coordinates of each of the weather stations of the indicated country
To execute any ForecastApp command you must use the following line of code dotnet CIAT.DAPA.USAID.Forecast.ForecastApp.dll this will execute the file that will start the ForecastApp process, this command must be followed by the action you want to do.
To execute the export of the coordinates WS PyCPT you must use the following command dotnet CIAT.DAPA.USAID.Forecast.ForecastApp.dll -out -fs -p “path where the file is exported” -c “country_id”.

Note
The command consists of the following parts:
dotnet CIAT.DAPA.USAID.Forecast.ForecastApp.dll = This is the first mandatory part for all ForecastApp commands, it must be complemented with the command you want to perform.
-out = As this is an export process, the -out parameter must be used to indicate that a data export will be performed.
-fs = Export the setup of every crop for the forecast process. It creates a folder by every crop, inside, the app will create a folder called by idweatherstation_idcultivar_idsoil.
-p “path where the file is exported” = The -p parameter indicates the path where the file to be exported, this parameter is followed by the path, example: -p “C:\Users\Csv\Export\”
In case you use a Linux operating system the path must be separated by / and in Windows you must use \.
Linux example: -p “/Users/Csv/Export/”
Windows example: -p “C:\Users\Csv\Export\”
-c value = Mandatory parameter. It is the ObjectId of Country to export data for only country indicated in the parameter.
Once the command is prepared with all the parameters, copy the command in the console and press Enter, the process will perform the export of all data and once finished it will display the message Export process has finished.
At the end of the export a folder called cultivos is generated inside this folder you will find a folder for each crop and inside the crop folder a folder with a name composed by the weatherStation_cultivar_soil Ids that contains the necessary files to run the crop model process during the forecast.
Oryza configuration files
For the configuration of the Oryza files it is necessary to have 4 files that configure the run for the region, these files are:
coordinates.csv (File with coordinates for the region)
.crp (Crop data file for rice growth model)
.sol (Soil information file)
*.exp (Experimental data file)
Note
Any error in each of these files will result in a failed run, i.e. the agro-climatic forecast for that region will not be generated.
The file “coordinates.csv” (it should always be saved with this name) should be constructed as follows (comma separated file):

Abbreviation |
Meaning |
|---|---|
lat |
latitud |
long |
longitud |
elev |
elevation |
Note
Decimal separators in this case are given by ‘.’ (period).
The “*.crp” file should contain the crop growth parameters once calibrated (remember that this file is the process of the researcher’s hard work). By recommendation the file name can be the name of the variety (e.g. F2000.crp).
The file “*.sol” soil data, for the soil water balance model. The name to pay tribute to the textural characteristic of the soil (e.g., loam_loam_clay.sol).
Finally, the experimental file “*.exp” which contains all the crop management. Since forecast runs are made, irrigation options should not be included. The file name can refer to the zone or region where the run is being configured (e.g. LOCO.exp). It should be noted that the run configuration should be done in experimental mode and not evaluation as is conventionally done for calibration, i.e., LOCO.exp:

Example of the required files.

Without the files shown above it is impossible to perform an agroclimatic forecast run. The climatic information does not need to be added in this step since the module automatically takes the climatic forecast loaded in the previous module.
DSSAT configuration files
The DSSAT configuration files must respect certain patterns both the name of the files and the configuration within them. The following is a description of the files needed to configure a run for a region. For this case it is necessary to have the following 5 files:
MZCER048.CUL
MZCER048.ECO
MZCER048.SPE
SOIL.SOL
planting_details.csv
The following is an example of each of the files, primarily as they should be configured for the correct specification of the model run. Any error in each of these files will result in a failed run, i.e. the agroclimatic forecast for that region will not be generated.
The file that defines the cultivar parameters, it is necessary that it is always saved as “MZCER048.CUL” and the name inside the file is a generic name given as “CROP00”, otherwise the platform will not generate the agroclimatic forecast. That is to say:

The name of the ecotype must match the file “MZCER048.ECO”

On the left side of the graph is shown the .cul file and on the left side the .eco file, showing where the names must match for the correct specification of the crop model run. The .spe file should not be medicated (leave the standard default that comes with the DSSAT installation).
The .sol file, should always be named “SOIL.SOL” and within its configuration it should be created as:

It is important that within the SOIL.SOL file it is accessed as “*USAID00001” since it is a generic name created for the correct operation of the platform.
Finally, to configure the run for the region it is essential to have this information inside the file “planting_details.csv” a file separated by commas and decimals by ‘.’ (period). Below is an example of the crop management for a particular region.

Note
The above parameters must be configured by the expert for the region, since any error will cause the agroclimatic forecast not to be generated.
coordenadas.csv
Column |
Meaning |
|---|---|
name |
Name of the variable |
value |
Value of the variable |
Note
The file must be in the following format:
The data it contains are: name, value.
The first row of the file is the header and should be in the following format:
name,value
The following lines should contain the information. Example:
lat,12.79
The following is an example of what the file would look like in the excel viewer
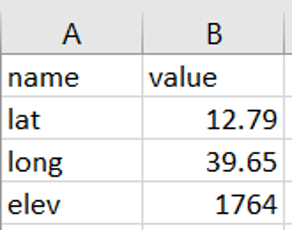
The following is an example of what the file would look like in text viewer

crop_conf.csv
Column |
Meaning |
|---|---|
name |
Name of the phenological phase |
min |
Minimum value |
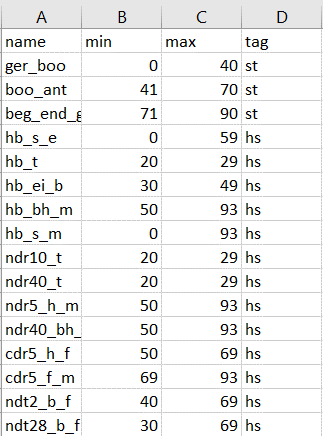
max |
Maximum value |
tag |
identifier to distinguish between the different phenological phases |
Note
The file must be in the following format:
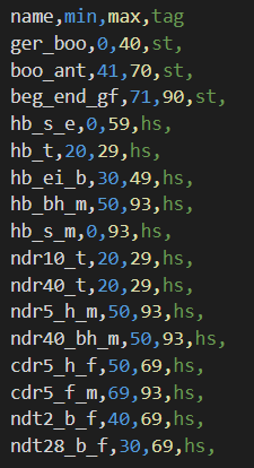
The data it contains are: name, min, max, tag.
The first row of the file is the header and should be in the following format:
name,min,max,tag
The following lines should contain the information. Example:
boo_ant,41,70,st
The following is an example of what the file would look like in the excel viewer
The following is an example of what the file would look like in text viewer
planting_details.csv
Column |
Meaning |
|---|---|
name |
Name of the variable |
crop_name |
Crop values |
Note
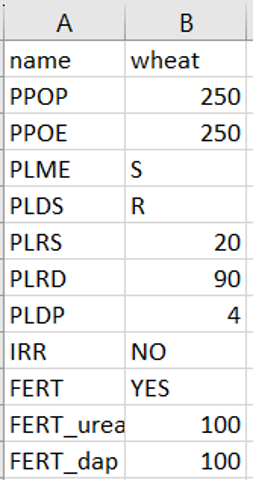
The file must be in the following format:
The data it contains are: name, crop_name.
The first row of the file is the header and should be in the following format:
name,wheat
The following lines should contain the information. Example:
PPOP,250
The following is an example of what the file would look like in the excel viewer
The following is an example of what the file would look like in text viewer

planting_window.csv
Column |
Meaning |
|---|---|
name |
Name of the variable |
value |
Value of the variable |
Note
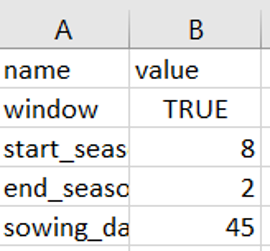
The file must be in the following format:
The data it contains are: name, value.
The first row of the file is the header and should be in the following format:
name,value
The following lines should contain the information. Example:
window,TRUE
The following is an example of what the file would look like in the excel viewer
The following is an example of what the file would look like in text viewer

Coordinates WS PyCPT
This command exports in a single file all the coordinates of each of the weather stations of the indicated country
To execute any ForecastApp command you must use the following line of code dotnet CIAT.DAPA.USAID.Forecast.ForecastApp.dll this will execute the file that will start the ForecastApp process, this command must be followed by the action you want to do.
To execute the export of the coordinates WS PyCPT you must use the following command dotnet CIAT.DAPA.USAID.Forecast.ForecastApp.dll -out -pyco -p “path where the file is exported” -st “state_id” -c “country_id”.

Note
The command consists of the following parts:
dotnet CIAT.DAPA.USAID.Forecast.ForecastApp.dll = This is the first mandatory part for all ForecastApp commands, it must be complemented with the command you want to perform.
-out = As this is an export process, the -out parameter must be used to indicate that a data export will be performed.
-pyco = Create a only file of weather station with their coordinates by country or state.
-p “path where the file is exported” = The -p parameter indicates the path where the file to be exported, this parameter is followed by the path, example: -p “C:\Users\Csv\Export\”
In case you use a Linux operating system the path must be separated by / and in Windows you must use \.
Linux example: -p “/Users/Csv/Export/”
Windows example: -p “C:\Users\Csv\Export\”
-st “value” = Optional parameter. It is the ObjectId of State to export coordinates of weather stations by State.
-c value = Mandatory parameter. It is the ObjectId of Country to export data for only country indicated in the parameter.
Once the command is prepared with all the parameters, copy the command in the console and press Enter, the process will perform the export of all data and once finished it will display the message Export process has finished.
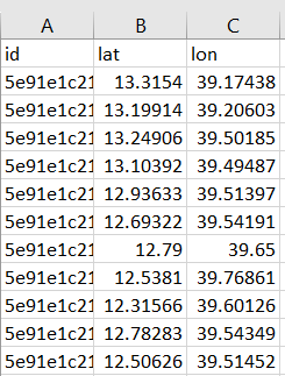
At the end of the export, the prediccionClimatica folder will be generated and within it the NextGen folder and within this folder there will be a CSV file with the name “stations_coords”.
Column |
Meaning |
|---|---|
id |
Weather station id |
lat |
latitud |
lon |
longitud |
Note
The file must be in the following format:
The data it contains are: id, lat, lon.
The first row of the file is the header and should be in the following format:
id,lat,lon
The following lines should contain the information for this station. Example:
5e91e1c214daf81260ebba53,13.3154,39.17438
The following is an example of what the file would look like in the excel viewer
The following is an example of what the file would look like in text viewer
